NVIDIA GeForce Experience is an application that is utilized to updates the driver automatically. It is also useful for video game optimization for GTX graphic card users. Although this is a convenient application that makes the task of keeping drivers up-to-date, it also can cause numerous issues. Sometimes, you get a message like “Unable to connect to NVIDIA” or “Unable to update drivers” while GeForce Experience is attempting to download the most recent drivers. This issue can happen at any time and for any length of time. This issue doesn’t make your system unusable. However, it can cause some games unplayable especially if you cannot update drivers for a long time.

Table of Contents
Unable to connect to NVIDIA nor Download Driver Updates
If you get the message like “Unable to connect to NVIDIA error”, so you are not alone because many people were getting the same error with their GeForce Experience application. Some of the related issues are like these:
- I get message “Unable to connect to NVIDIA” error.
- I am unable to download any new driver updates.
- I just started getting the error message “Unable to connect to NVIDIA” after I updated to Windows 10.
- I got this problem appears after I reinstall my Windows. Before that, it was fine, and now NVIDIA GeForce Experience unable to connect.
- GeForce Experience shows me a message, “Unable to connect to NVIDIA. Try again later”.
This error primarily occurs with NVIDIA GeForce Experience application, which is a part of NVIDIA graphics card driver. It manages a few things like graphics card driver upgrade, games optimization, capture and share videos, live streams and screenshots between users, etc. This application helps the GeForce GTX graphics card, and numerous users prefer utilizing it for automated driver updates.
To better understand the best ways to solve “Unable to Connect to NVIDIA” error, we require initially to learn why it takes place. Put simply NVIDIA’s Network Service crashes while aiming to start and ends up at “Starting” status. Due to the fact that the application can not start properly, it shows the error below:
Unable to connect to NVIDIA Try again later
When this error message appears, it prevented GeForce Experience from updating itself or the video card driver. While it’s not a big deal to download manually new drivers from nVidia’s official website, we will guide you how to solve the problem.

Unable to connect to NVIDIA Check your internet connection
Furthermore, the NVIDIA GeForce Experience suggests users examine the internet connections.

While it could be an excellent idea to do so, there are usually no problems with the internet connections, and NVIDIA’s servers are at fault. However, our security specialists assembled few alternatives that may help you to fix “Unable to Connect to NVIDIA” error.
How to Solve GeForce Experience “Unable to connect to NVIDIA” Error in Windows 10/8/7?
If you are getting connection errors within NVIDIA GeForce Experience in Windows 10 or earlier version (Windows 8.1, Windows 8, Windows 7), this is a known issue on NVIDIA side and has nothing to do with the client side. NVIDIA is actively working on every problem happens.
One of the most popular issue that many people got while updating Windows to Windows 7 or newer version is that NVIDIA GeForce Experience shows error message “Unable to connect to NVIDIA” on your Windows computer which has NVIDIA graphics card drivers installed, which indicates that NVIDIA GeForce Experience application is not able connecting to the internet. You do not have to worry because many people were getting the same error and the good news is we got some smart solutions for you.
Here are six best solutions for “Unable to connect to NVIDIA” issue:
Method 1: Restart the NVIDIA Network Service
If you got “Unable to connect to NVIDIA” error message, it could be one of two possibilities. Either the NVIDIA servers are in the middle of the problem so you will have to connect again later, or the NVIDIA Network Service is in trouble condition and needs to be restarted. You can restart the NVIDIA Network Service using this following guide:
- Navigate the following path: “C:\ProgramData\Nvidia Corporation\NetService\” and then search for “NSManagedTasks.xml” file.
- Delete the “NSManagedTasks.xml” file above.
- Open the Windows Task Manager by going through the Start button or using the keyboard shortcut: “CTRL + ALT + DELETE” altogether.
- Under the Process tab, locate “NVNetworkService.exe” and select it, then right click and select End task to stop this service.
- Open the Run dialogue box by going through the Start button or using the keyboard shortcut: Windows + R. Then type “services.msc” and press ENTER.
- Go back to the “Services” windows and then right-click on “NVIDIA Network Service”, select “Start” to start the service again.
- After following the steps, then open the NVIDIA GeForce Experience application and see if the problem solved or not. Hope you have successfully cleared the “Unable to connect to NVIDIA” error.
If the problem still exists, you can try the next method.
Method 2: Edit Hosts File
If the method above does not solve the problem, then you should try this guide for editing the “hosts” file:
- Navigate the following path: “C:\Windows\System32\drivers\etc” and then search for “hosts” file.
- Right-click the “hosts” file, then select Open with menu, choose Notepad from the available options and click OK button.
- Create a backup file before you edit the “hosts” file.
- If “localhost = 0.0.0.0” then change that to “localhost = 127.0.0.1” and Save it by press “CTRL + S” button. If you cannot make the change directly, then you need to copy the “hosts” file to your Desktop and change it in there, then copy and paste to replace the “hosts” file in “C:\Windows\System32\drivers\etc” with the new “hosts” file you just edited.
- Open NVIDIA GeForce Experience and check if the problem solved or not.
If the problem still appears, then you should try the following method.
Method 3: Reinstall NVIDIA GeForce Experience
Some people got this “Unable to connect to NVIDIA” issue after upgrading to Windows 10. Unfortunately, some solutions above did not work but do not worry because we found an easier one. Just uninstall the NVIDIA GeForce Experience application then download and reinstall it, especially when it is older than 2.5xx. Here are the steps for reinstalling the NVIDIA GeForce Experience:
- Quit the running NVIDIA GeForce Experience application.
- Go to “Control Panel > Program and Features”.
- Find the NVIDIA GeForce Experience program and click on it to uninstall. Then follow any on-screen instructions as and when it appears.
- To reinstall the NVIDIA GeForce Experience application, go to “https://www.nvidia.com/en-us/geforce/geforce-experience/” by using browser application (example: Chrome, Firefox).
- Download the latest NVIDIA GeForce Experience application in there.
- Follow the instructions to install the application step-by-step until the finish.
- Open the NVIDIA GeForce Experience application and check if the problem solved or not. Hope this time the NVIDIA GeForce Experience application able to connect to NVIDIA server and update drivers for your NVIDIA graphic card on Windows 10.
If the problem still appears, then try the following method.
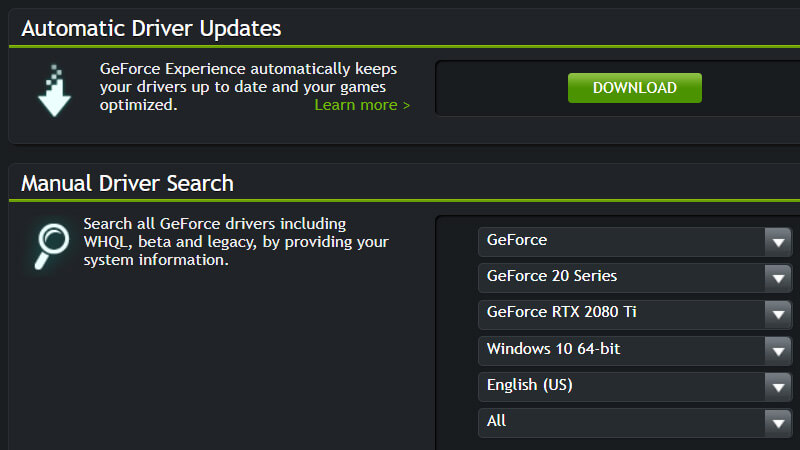
Method 4: Download Automatic Driver Update
The primary reason behind “Unable to connect to NVIDIA” problem is usually caused by the failure of the driver to update automatically. If you can update the driver, so the problem solved. Follow these steps for downloading the Automatic Driver Update to solve the problem:
- Go to “https://www.geforce.com/drivers” by using browser application (example: Chrome, Firefox)
- Click “Download” button under Automatic Driver Updates.
- Install the application that has been downloaded.
- This installation process will install the latest components and version for NVIDIA GeForce Experience, and the most recent drivers then automatically downloaded via the console for the video graphic card without issue.
- Open the NVIDIA GeForce Experience application and check if the problem solved or not. Hope this method can quickly fix the “Unable to connect to NVIDIA” problem.
If the problem still exists, you can try the next method.

Method 5: Update NVIDIA Graphic Card Driver Manually
Some people unable to download the updates from NVIDIA GeForce Experience. Whenever they try to download the updates from the NVIDIA GeForce Experience application, the whole application freezes and then crash.
If you are failing to update the drivers through NVIDIA GeForce Experience, then your option is to download and install the driver manually. Be sure not to download drivers from untrusted sources. Just go to the NVIDIA’s official website and download the driver from there, then install it through the device manager. Here are the steps:
- Go to “https://www.geforce.com/drivers” by using browser application (example: Chrome, Firefox).
- Search for the driver under Manual Driver Search section and then download it.
- After downloading the driver then open the Run dialogue box by going through the Start button or using the keyboard shortcut: Windows + R. Then type “devmgmt.msc” and press ENTER. The Driver Manager window will be opened soon. You can expand the Display Drivers by double-clicking it.
- Right-click on your graphics card and choose Update driver software option.
- Select Browse my computer for driver software and then click Browse.
- Go to the location where you downloaded the graphics card driver file in step 2 and select it.
- Click Next and follow any on-screen instructions.
- After following the steps above, then open the NVIDIA GeForce Experience application and see if the problem solved or not.
If the problem still exists, you can try the next method.
Method 6: Download Latest Version of NVIDIA GeForce Experience
If any of the methods suggested above are not correctly working for you and you still get the NVIDIA GeForce Experience “Unable to connect to Nvidia” error, then you should update the NVIDIA GeForce Experience application to the latest version. Follow this step-by-step for downloading the most recent of NVIDIA GeForce Experience:
- Go to “https://www.nvidia.com/en-us/geforce/geforce-experience/” by using browser application (example: Chrome, Firefox).
- Download the most recent version of the NVIDIA GeForce Experience application.
- Install the downloaded application by following on-screen instructions, and you are good to go.
- Open the NVIDIA GeForce Experience application and see if the problem solved or not. Hope this method will help you to get rid of “Unable to connect to NVIDIA” error permanently.

Some methods mentioned above will help you to get rid of the “Unable to connect to NVIDIA” error permanently. We hope you find these solutions helpful and fix the “Unable to Connect to NVIDIA” problem within a few minutes. In case you stuck somewhere then you can communicate with us using the comment section below. You can share your experiences, reviews, and suggestions in the same comment section. Thank you!

Hey, thank you .. your tutorial is complete!
You’re welcome. Hopefully it can help you.
Guys please help me. After installing the latest driver and then clicking on express installation, there is a pop up saying that cannot continue installation. Please help me!
Yeah, brilliant, it worked for me as well.
Whenever I start GeForce experience, I get an unable to connect to NVidia error but then the program window will pop up anyways, likewise, I am unable to download any new updates to drivers with a similar error. Please advise on this issue!